I went to a shop in Manchester called Fred Aldous to see what paints I could pick up for glass and porcelain. I found some paints and pens for them so I got porcelain paint in black, a pink porcelain pen, and glass paints in brown and red. I just got a couple of colours each to play around with. I also found some glass circles which I bought in a few sizes to play around with. Here I have painted a tree onto one of the glass circles, I still need to put it in the oven!
Glass paints. I did not realise that you are supposed to mix these paints with a solution called vitrea, which I discovered after reading the label properly when I got back to Leeds! I have used them as they are anyway to see what happens, I need to find out vitrea actually is.
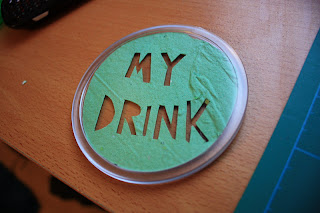
I bought some transparent coasters which come in two pieces so I can create an image to put into the coaster and they pieces slot together around it. I did some paper cutting with the paper I made using a craft nice. It was quite difficult as the paper is quite delicate and easily tears. I found it difficult to get the circle the right size and shape using a craft knife. I tried to add more detail to this around the edge and I ended up tearing it slightly. I want to do it again and be more careful!
Playing around with image ideas and getting used to cutting the paper. I want to continue paper cutting and develop the images for the coasters.
To be continued...
Saturday, 29 October 2011
Friday, 28 October 2011
Pyrography Pen
Jonathon let me take a few cut offs of wood to experiment with the pyrography pen. He gave me a range of light and dark wood to see how they work with the pyrography pen.
Woods I have;
- cherry
- elm
- oak
- jeluton
- beech
- ash
- tulipurced
- sapele
- walnut
- pine
I like the aesthetic the pen creates, I have started going along the grain of the wood as I have been warned it is quite difficult to create images against the grain. It gets a bit smokey.
Now I tried going againt the grain in smaller lines, it wasn't too bad on this wood.
I tried to draw some clouds, it was quite hard to keep the curved lines neat!
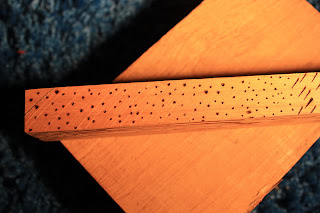
Dots and lines, seeing how different marks in the wood look.
After mark making and getting used to how to handle the pyrography pen I then tried to create an image onto a block of oak wood.
My friend Lucy had warned me that the tip of the pen becomes loose after a while and need tighening. It started to do this but as it is so hot I had to switch it off and let it cool before tightening. It made creating the image more difficult as the tip kept twisting as I was trying to make marks on the wood. I want to try more and see what images the other tips for the pen can create. I like this process and aesthetic of the lines and image on the wood.
Tuesday, 25 October 2011
Sunday, 23 October 2011
Glass results
More mugs after biscuit firing, ready to glaze.
Glass out of the kiln! Andy showed me how to make a mould out of plaster that this piece of glass will sink into to create a bowl shape. I am pleased with how the colours and image turned out.
The leaf turned black! I am surprised with the result of the leaves in the glass. The effect of the high temperatures of the kiln on the colour and aesthetic of the leaf is really interesting and unexpected, and I like it!
This piece has come out particulaly crazy. I used some coloured frits and in the middle I placed a leaf. The leaf has almost fully disintegrated and a bubble has formed in the middle of the glass! I don't know if this is because there was trapped air or whether it was because I hadn't cut the glass to the same size. Fascinating though!
The colours of the tree have darkened in the kiln and some have blended together.
Whittling Wood
Today was the day I tried some wood carving. Jonathon set me up with some tools and informed me of health and safety rules etc before letting me have a play around. He gave me jeluton wood to work on first as it is a softer wood and better for beginners. Wood such as ash, maple and walnut can be used but they are harder woods to carve into so its best to start on a softer wood to get a feel for it. There are so many different tools and shapes of chisels and things to choose from I started off by just mark making into the wood with various different tools.
Mark making.
Then I thought I might try and make a mountain shape in the wood. I discovered that it is much easier to carve along the grain rather than across it, the wood kept splitting! It is quite strenuous work, quite tiring! I was getting quite hot and bothered doing it but I carried on.
I then thought I might try and make some sort of face in the side of the wood. I was going for a hedgehog face. But as I started to chisel away I was getting quite tired and didn't make the hedgehog face fully. I think you can still tell what its meant to be though!
Mark making the hedgehog.
Finished face!
So many tools!
Today made me realise just how physical wood work and carving is, it is quite demanding and you have to have a lot of patience. I also asked Jonathon about the pyrography pen and what wood is best to use it on. He said any light wood really, and gave me a few off cuts to take and and try it with this week. I also asked about carving into found wood and he said that its fine as long as the wood is dry and doesn't have anything in it such as nails etc.
Thursday, 20 October 2011
More Glass Work
I did some more glass work today using 2mm and 3 mm glass. My cutting is getting slightly better but it is still difficult! I tried to make an image of a tree using the frits, I do find the powder difficult to make the image I want on the glass.
A tree!
Making a bit of a mess! The colours all mix together on the glass and when trying to remove excess frits.
Some improved cutting attempts!
Leaves in glass.
Ready to gooooo in the kiln.
A tree!
Making a bit of a mess! The colours all mix together on the glass and when trying to remove excess frits.
Some improved cutting attempts!
Leaves in glass.
Ready to gooooo in the kiln.
Pyrography Pen
My kind friend Lucy is going to let me use her pyrography pen to experiment with over reading week. She has used it a lot before and said the wood she used was from old wine cases and also said that the pen becomes temperamental when going against the grain of the wood. I wonder if I can use it on found wood? I am also going to ask Matt his advice tomorrow and see if I can get any small pieces of wood to use over reading week.
Wood Carving
As I am going to try my hand at a bit of wood carving tomorrow, it reminded me of these amazing carvings I stumbled across on a walk a while ago. I am looking to learn the basics and see how the process works. It must take such skill and patience to do carvings like these, and I love how left among the trees for people to find, its like street art for the countryside. I have seen other carvings like this in different places around different parts of the North, I would love to know who does them!
Subscribe to:
Posts (Atom)


