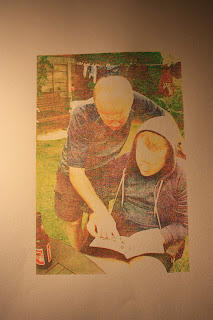
The frames were already clean so one by one we took our images to the computer to print them out in the right format, four images CKMY, one image to be transferred to the screen for four different colours, Cyan, Black, Magenta and Yellow. Cyan and Black were transferred at the back of the screen and Yellow and Magenta at the front. Place frame onto vacuum, place coil on the side of the frame, clamp, vacuum, start. Once the transfer was complete I had to wash the screen thoroughly inside first and then outside. Holding up to the light to check if I had rinsed enough.
Screen drying.
Whilst we were taking it in turns to print our images we mixed the colours together in plastic pots. Measurements, 50g of paint colour and 100g of binder. Mixing thoroughly to avoid streaks in the paint.
The first colour to print is Cyan. I put brown tape over the image directly next to the Cyan image and around the edge of it the prevent the paint from getting onto the other parts of the screen. Also had to put tape all around the edge of the screen to prevent the paint from going through. Sealing off all areas that the paint could get through. Using the squidy I test out the image on opaque paper to begin with, this is also for marking out where the paper will go so that every colour is printed on top of each other correctly and in line. I used thinner paper for some practice runs as I was slightly nervous and had to make sure the paint transferred through right and neatly. I then marked out where the good cartridge paper would be placed so that I printed in the same place every time. Marking out with masking tape on the printing machine.
I found at first I wasn't pressing hard enough on the squidy to transfer enough paint through, as I got into it after a few goes I began feeling more confident to press down harder and not be too cautious in that respect. Once I got into a rhythm of printing and knew what I was doing more I started really enjoying the process. I took my time and made sure I had done everything in the right order to prevent any mishaps.
Once I had printed the Cyan, rinsed the screen thoroughly and taken off the tape, I let the screen dry in the drying room and then moved onto the next colour, Yellow.
Cyan
Yellow
Magenta
Black
I am absolutely fascinated by this process and the image that is created from four key colours. I am really pleased with the image and am itching to go back and explore it more! I really want to use the printroom more as I haven't used them as much as I would have liked too and there is so much to do!
The final image on Cartridge paper 300 grams.


No comments:
Post a Comment